Digital Wallet Provisioning
Learn about digital wallet provisioning using the Rapyd API. Manage your tokens via manual or in-app provisioning, list your card tokens, and change your token status. You can add an issued card to a digital wallet through a process called provisioning. A card is provisioned when the Primary Account Number (PAN) of the issued card is tokenized and stored as a digital token. The digital token is then added to the digital wallet to store the card information. Multiple digital tokens can be assigned to the same card. Digital wallet provisioning is useful for merchants using digital wallets with multiple different cards when collecting payments.
You can provision cards issued by Rapyd and add them to a digital wallet such as Apple Pay and Google Pay.
There are two main types of provisioning: manual provisioning and in-app provisioning.
Manual provisioning refers to the process where the customer's card details are manually added to a local mobile digital wallet stored on a mobile device. This action is usually performed by the customer.
In-app provisioning refers to the process where the customer's card details are added to the digital wallet using an app created by the issuer. Manual and in-app provisioning are similar, but require different levels of verification for transmitting and storing Personal Identifying Information (PII).
You can use the Rapyd API to provision issued cards to a digital wallet.
You can manage your card tokens using the Rapyd API. You can create tokens, disable tokens, and change the token status. The flow chart below describes the token lifecycle and demonstrates the relationship between the various token statuses.
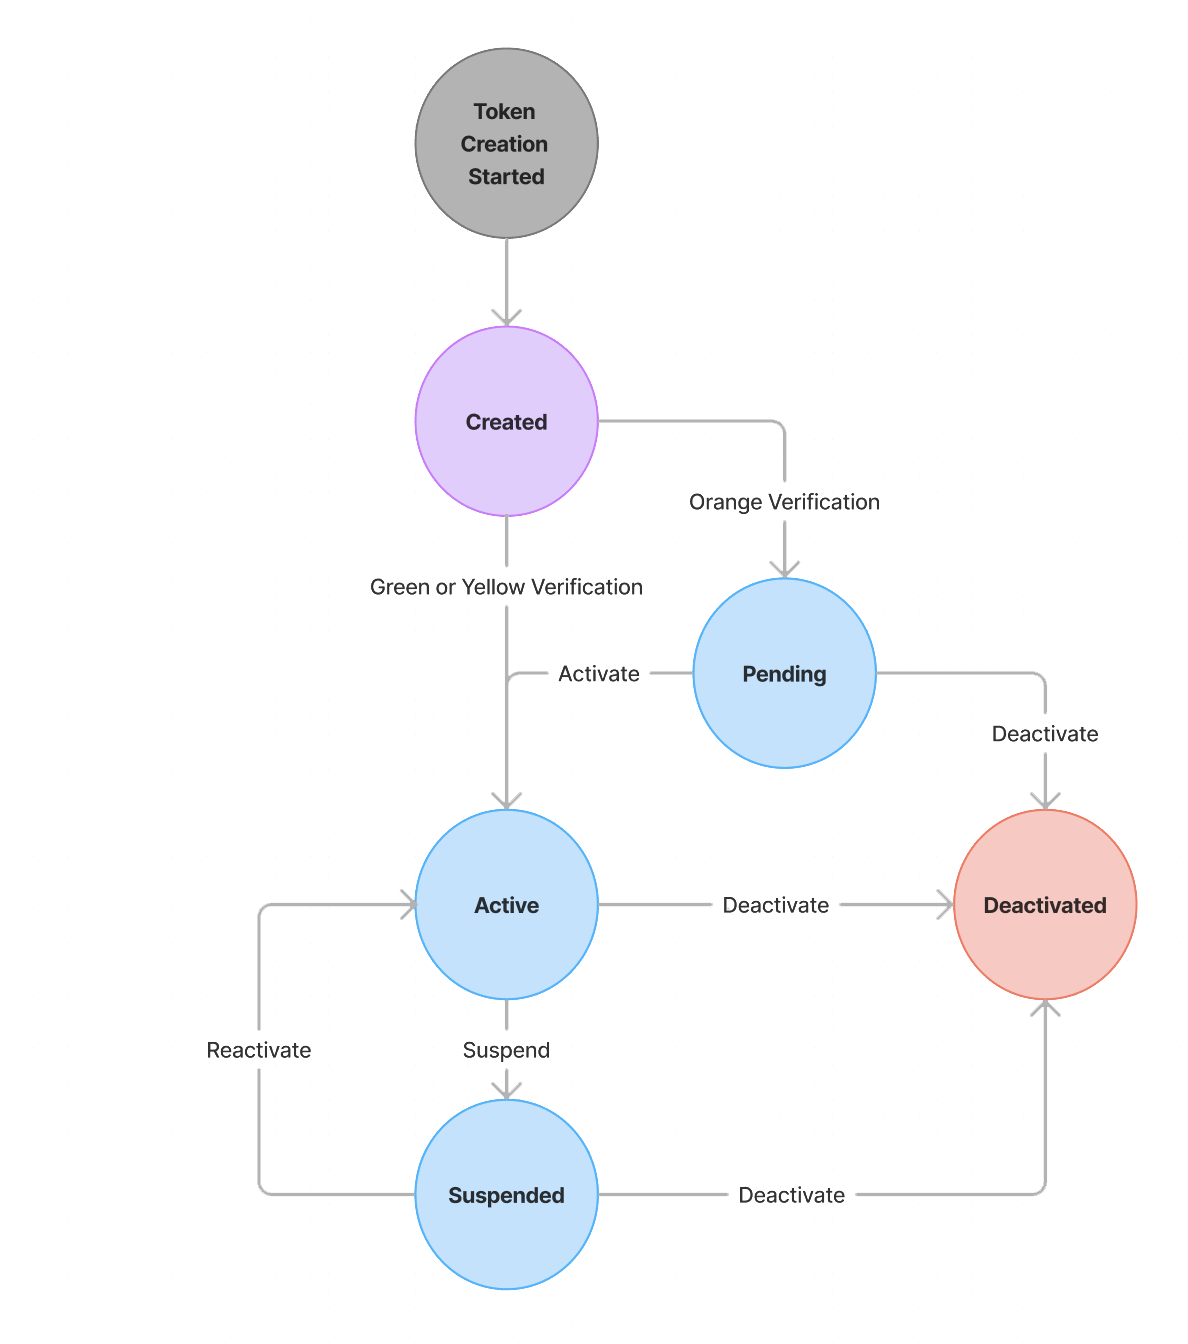
The token statuses are summarized in the table below:
Description of Token Statuses
Token Status | Description |
|---|---|
Created | Creation of the token is in progress. |
Active | The token is active and can be used to make payments. |
Pending | The token is pending activation. Relevant for tokens requiring orange verification. |
Suspended | The token is temporarily suspended and can be activated again. |
Deactivated | The token has been deactivated or deleted. |
Token Request Verification
When a card token is requested, certain levels of verification may be required by the issuer. The following table describes the different verification levels and their requirements:
Description of Verification Levels
Verification Level | Provisioning Type | Description |
|---|---|---|
Green Verification | In-app | No additional verification is required for the token request |
Yellow Verification | Manual / In-app | Enter your One Time Password (OTP) to complete the verification |
Orange Verification | Manual / In-app | Enter your One Time Password and speak with your issuer over the phone. Contact your issuer for additional verification. |
As a merchant partnered with Rapyd, you would like to provision issued cards to your local application. You integrate with Google Pay or Apple Pay to expand the functionality of your mobile application. You use the Rapyd API to enable card provisioning. Customers can add their cards to their Google Pay wallet or Apple Pay wallet using your application, improving their experience.

The customer manually adds their card details to a digital wallet.
Rapyd processes the token information, sends a OTP verification.
Token is created by the Card Network.
Token is activated in the digital wallet servers.
Customer completes the verification (either with OTP, or OTP and Issuer Verification).

You add the customer card details via your application.
The provisioning request is sent to Rapyd.
The customer completes the verification (OTP and Issuer Verification).
You get a response payload with the token. You forward the token to the mobile ewallet app to create the digital token.
PCI Certification
Only clients with PCI-DSS certification can handle personal identifying information for cards. This method is available to merchants who have signed a special agreement with Rapyd.
In-App Provisioning Requirements
Before you can enable in-app provisioning using the Rapyd API, you must also integrate with Apple Pay or Google Pay developer platforms. Each digital wallet service has a set of requirements you must meet in order to integrate the Google Pay or Apple Pay functionality into your application.
After integration, the Rapyd API enables you to use in-app provisioning for cards issued by Rapyd.
For more specific information about how to integrate with Google Pay or Apple Pay, view the Apple developer documentation and the Google developer documentation.
Meet the following requirements to complete your integration:
Integrate with the card issuer.
Note: Rapyd, as your card issuer, will interact with the digital wallet servers to pass encrypted payload data and tokenize card information.
Register as a developer with your digital wallet provider (Google Pay or Apple Pay).
Display the Apple Pay or Google Pay button in your application.
Initiate the provisioning request.
Note: You will use the Rapyd API to initiate the provisioning request.
In-app Provisioning
You can provision a card to a digital wallet. Use the applicable path parameters for the request:
Description of Path Parameters
Path Parameter | Description |
|---|---|
google_pay | The Google Pay digital wallet used for card provisioning. |
apple_pay | The Apple Pay digital wallet used for card provisioning. |
Note: The google_pay path parameter is used in the example request below.
In-app Provisioning Request
Request
// Request URL: POST https://sandboxapi.rapyd.net/v1/issuing/cards/:card_id/card_tokens/google_pay

{
  "client_wallet_provider": "40010075001",
  "client_wallet_account_id": "4CEBB556CBB31B94",
  "client_device_id": "je-UCHgwQ97Icy-wrI_f48PU"
}
In-app Provisioning Response
Response
{
    "status": {
      "error_code": "",
      "status": "SUCCESS",
      "message": "",
      "response_code": "",
      "operation_id": "11b95b4b-7783-4062-b32f-d607c3f5bad1"
  },

  "data": {
    "PaymentInstrumentData": "",
    "UserAddress": {
    }
  }
}
You can list the existing card tokens attached to a specific card. Use the following parameters:
Description of Path Parameters
Path Parameter | Description |
|---|---|
card_id | The ID of the card starting with card_. |
List Available Card Tokens Request
Request
// Request URL: GET https://sandboxapi.rapyd.net/v1/issuing/cards/:card_id/card_tokens

// Message body absent
List Available Card Tokens Response
Response
{
    "status": {
      "error_code": "",
      "status": "SUCCESS",
      "message": "",
      "response_code": "",
      "operation_id": "386fcaf5-d50c-43b0-9d12-ead3d3c0ef11"
  },
  "data": [
    {
      "HashedTokenId": "p37Y9skr7289mUWKrCSss+L47yjDGkEcD5BOuYXRMV0=",
      "TokenIdLast4": "L011",
      "DeviceId": "TestDeviceId987654321011",
      "DeviceManufacturer": "LG",
      "DeviceLanguageCode": "is",
      "DeviceName": "G8 Feitur V",
      "CreationTime": "2019-04-01T00:00:00",
      "TokenRequestorId": "40010030273",
      "TokenRequestorName": "Apple Pay",
      "Status": "INACTIVE"
    },
    {
      "HashedTokenId": "WcOpDxmzhWN9SCp2nTf0mtIN+6DKHBr9/uNak/nTXg4=",
      "TokenIdLast4": "L012",
      "DeviceId": "TestDeviceId987654321012",
      "DeviceManufacturer": "LG",
      "DeviceLanguageCode": "is",
      "DeviceName": "G8 Feitur V",
      "CreationTime": "2019-04-01T00:00:00",
      "TokenRequestorId": "40010075001",
      "TokenRequestorName": "Google Pay",
      "Status": "SUSPENDED"
    },
    {
      "HashedTokenId": "rUIJkyoz4J8EvxsZuedskKjA+fOYluu0GRZXARd2ytE=",
      "TokenIdLast4": "L013",
      "DeviceId": "TestDeviceId987654321013",
      "DeviceManufacturer": "LG",
      "DeviceLanguageCode": "is",
      "DeviceName": "G8 Feitur V",
      "CreationTime": "2019-04-01T00:00:00",
      "TokenRequestorId": "40010051602",
      "TokenRequestorName": "Amazon",
      "Status": "ACTIVE"
    },
    {
      "HashedTokenId": "9Q5xEzliI1Iyx0FU4gWKML2YUnGEUuCGVAExDHjKsts=",
      "TokenIdLast4": "L014",
      "DeviceId": "TestDeviceId987654321014",
      "DeviceManufacturer": "LG",
      "DeviceLanguageCode": "is",
      "DeviceName": "G8 Feitur V",
      "CreationTime": "2019-04-01T00:00:00",
      "TokenRequestorId": "40010075839",
      "TokenRequestorName": "Netflix",
      "Status": "DEACTIVATED"
    }
  ]
}
You can change the status of your card token to one of the following statuses:
Active
Pending
Suspended
Deactivated
Use the following path parameters and required fields in the request:
Description of Path Parameters
Path Parameter | Description |
|---|---|
activate | The token will be activated. |
reactivate | The token will be reactivated. |
suspend | The token will be suspended. |
Note: The suspend path parameter will be used in the example request below
Use the following required fields in the request:
Description of Required Fields
Field | Description |
|---|---|
hashed_token_id | A unique identifier for the token. |
performed_by | The user submitting the token status change. Character length: 50. |
request_reason | The reason for the token status change. Character length: 5 - 254. |
Change Token Status Request
Request
// Request URL: POST https://sandboxapi.rapyd.net/v1/issuing/cards/:card_id/card_tokens/suspend

{
  "hashed_token_id": "dB/xDjJzxcwruDMTMLmdjs7UZ7JW97CHKwmMgg9hk14=",
  "performed_by": "user name",
  "request_reason": "some reason"
}
Change Token Status Response
Response
{
  "status": {
    "error_code": "",
    "status": "SUCCESS",
    "message": "",
    "response_code": "",
    "operation_id": "60e0671a-cae9-4568-bb8c-8db58677dc46"
  }
}