Issued Card Activation
Activate Issued Cards with a Hosted Page or embed with a Toolkit Integration.
The Hosted Card Activation Page is a generated secure page for your users to activate an issued card and receive a PIN. The Hosted Card Activation Page will request a verification code sent to the customers mobile phone. Once the verification code is submitted, a success page will show with the card PIN.
Common Use Cases
You issued cards to your customers and need a secure way to activate the card and display a card PIN to the cardholders.
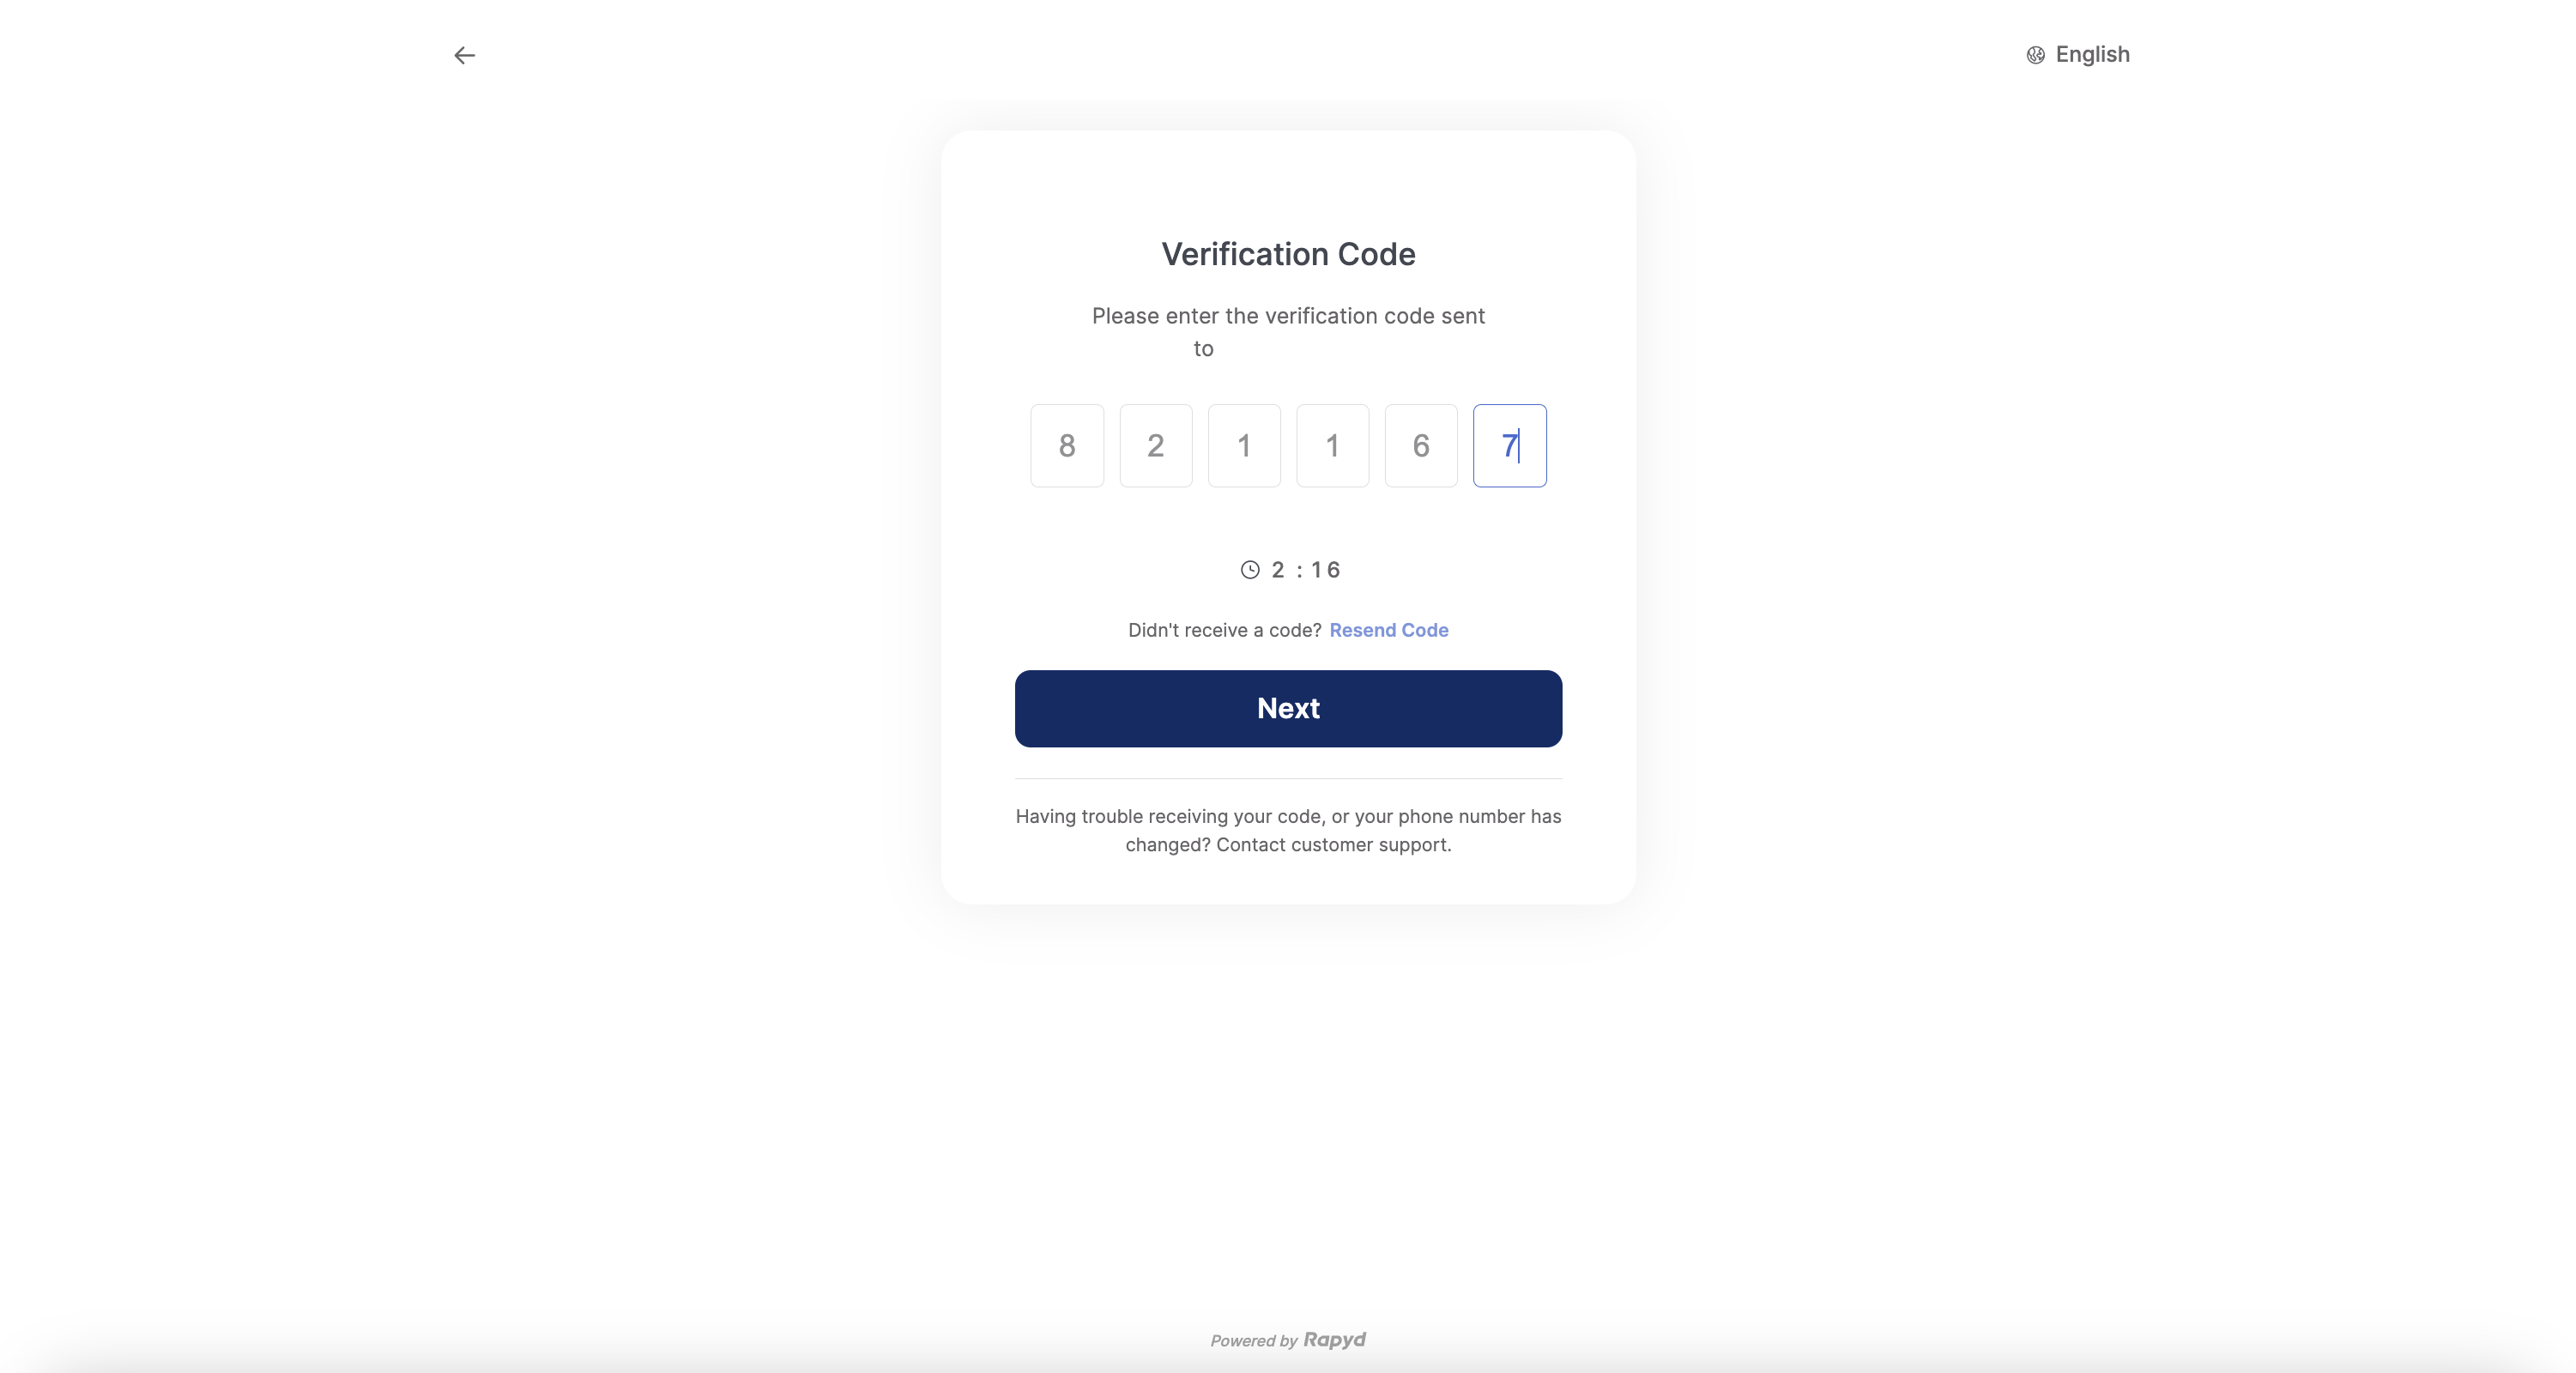
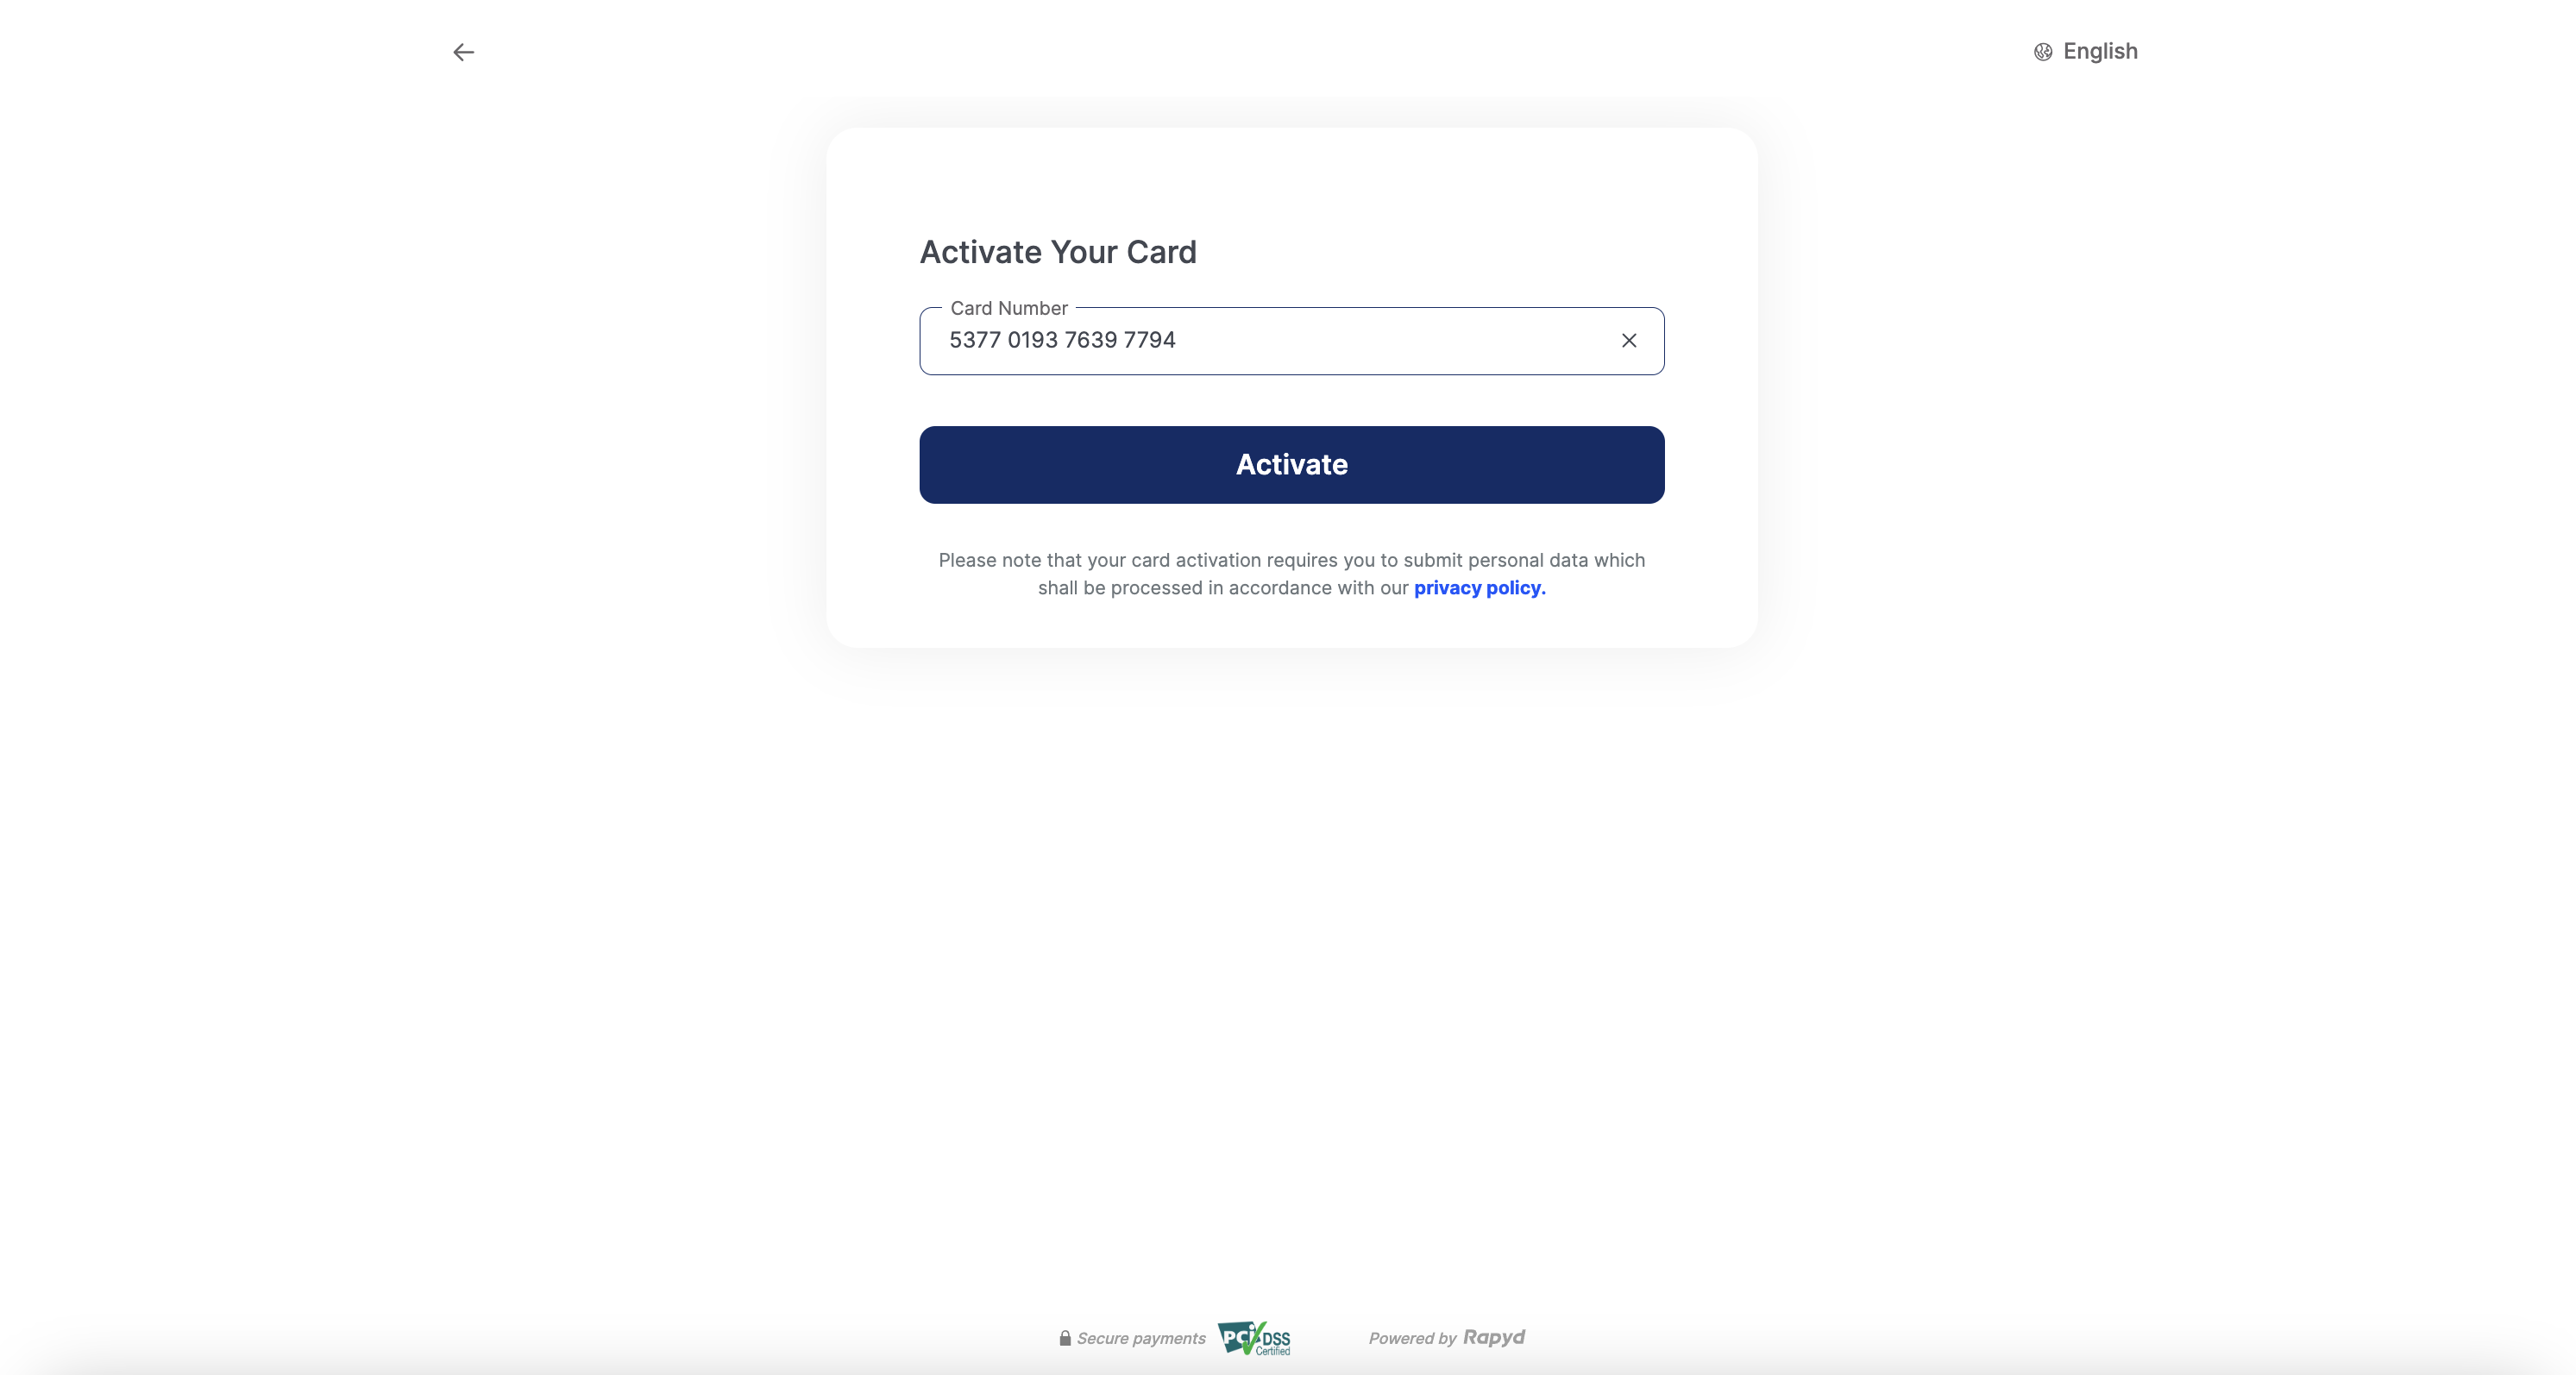
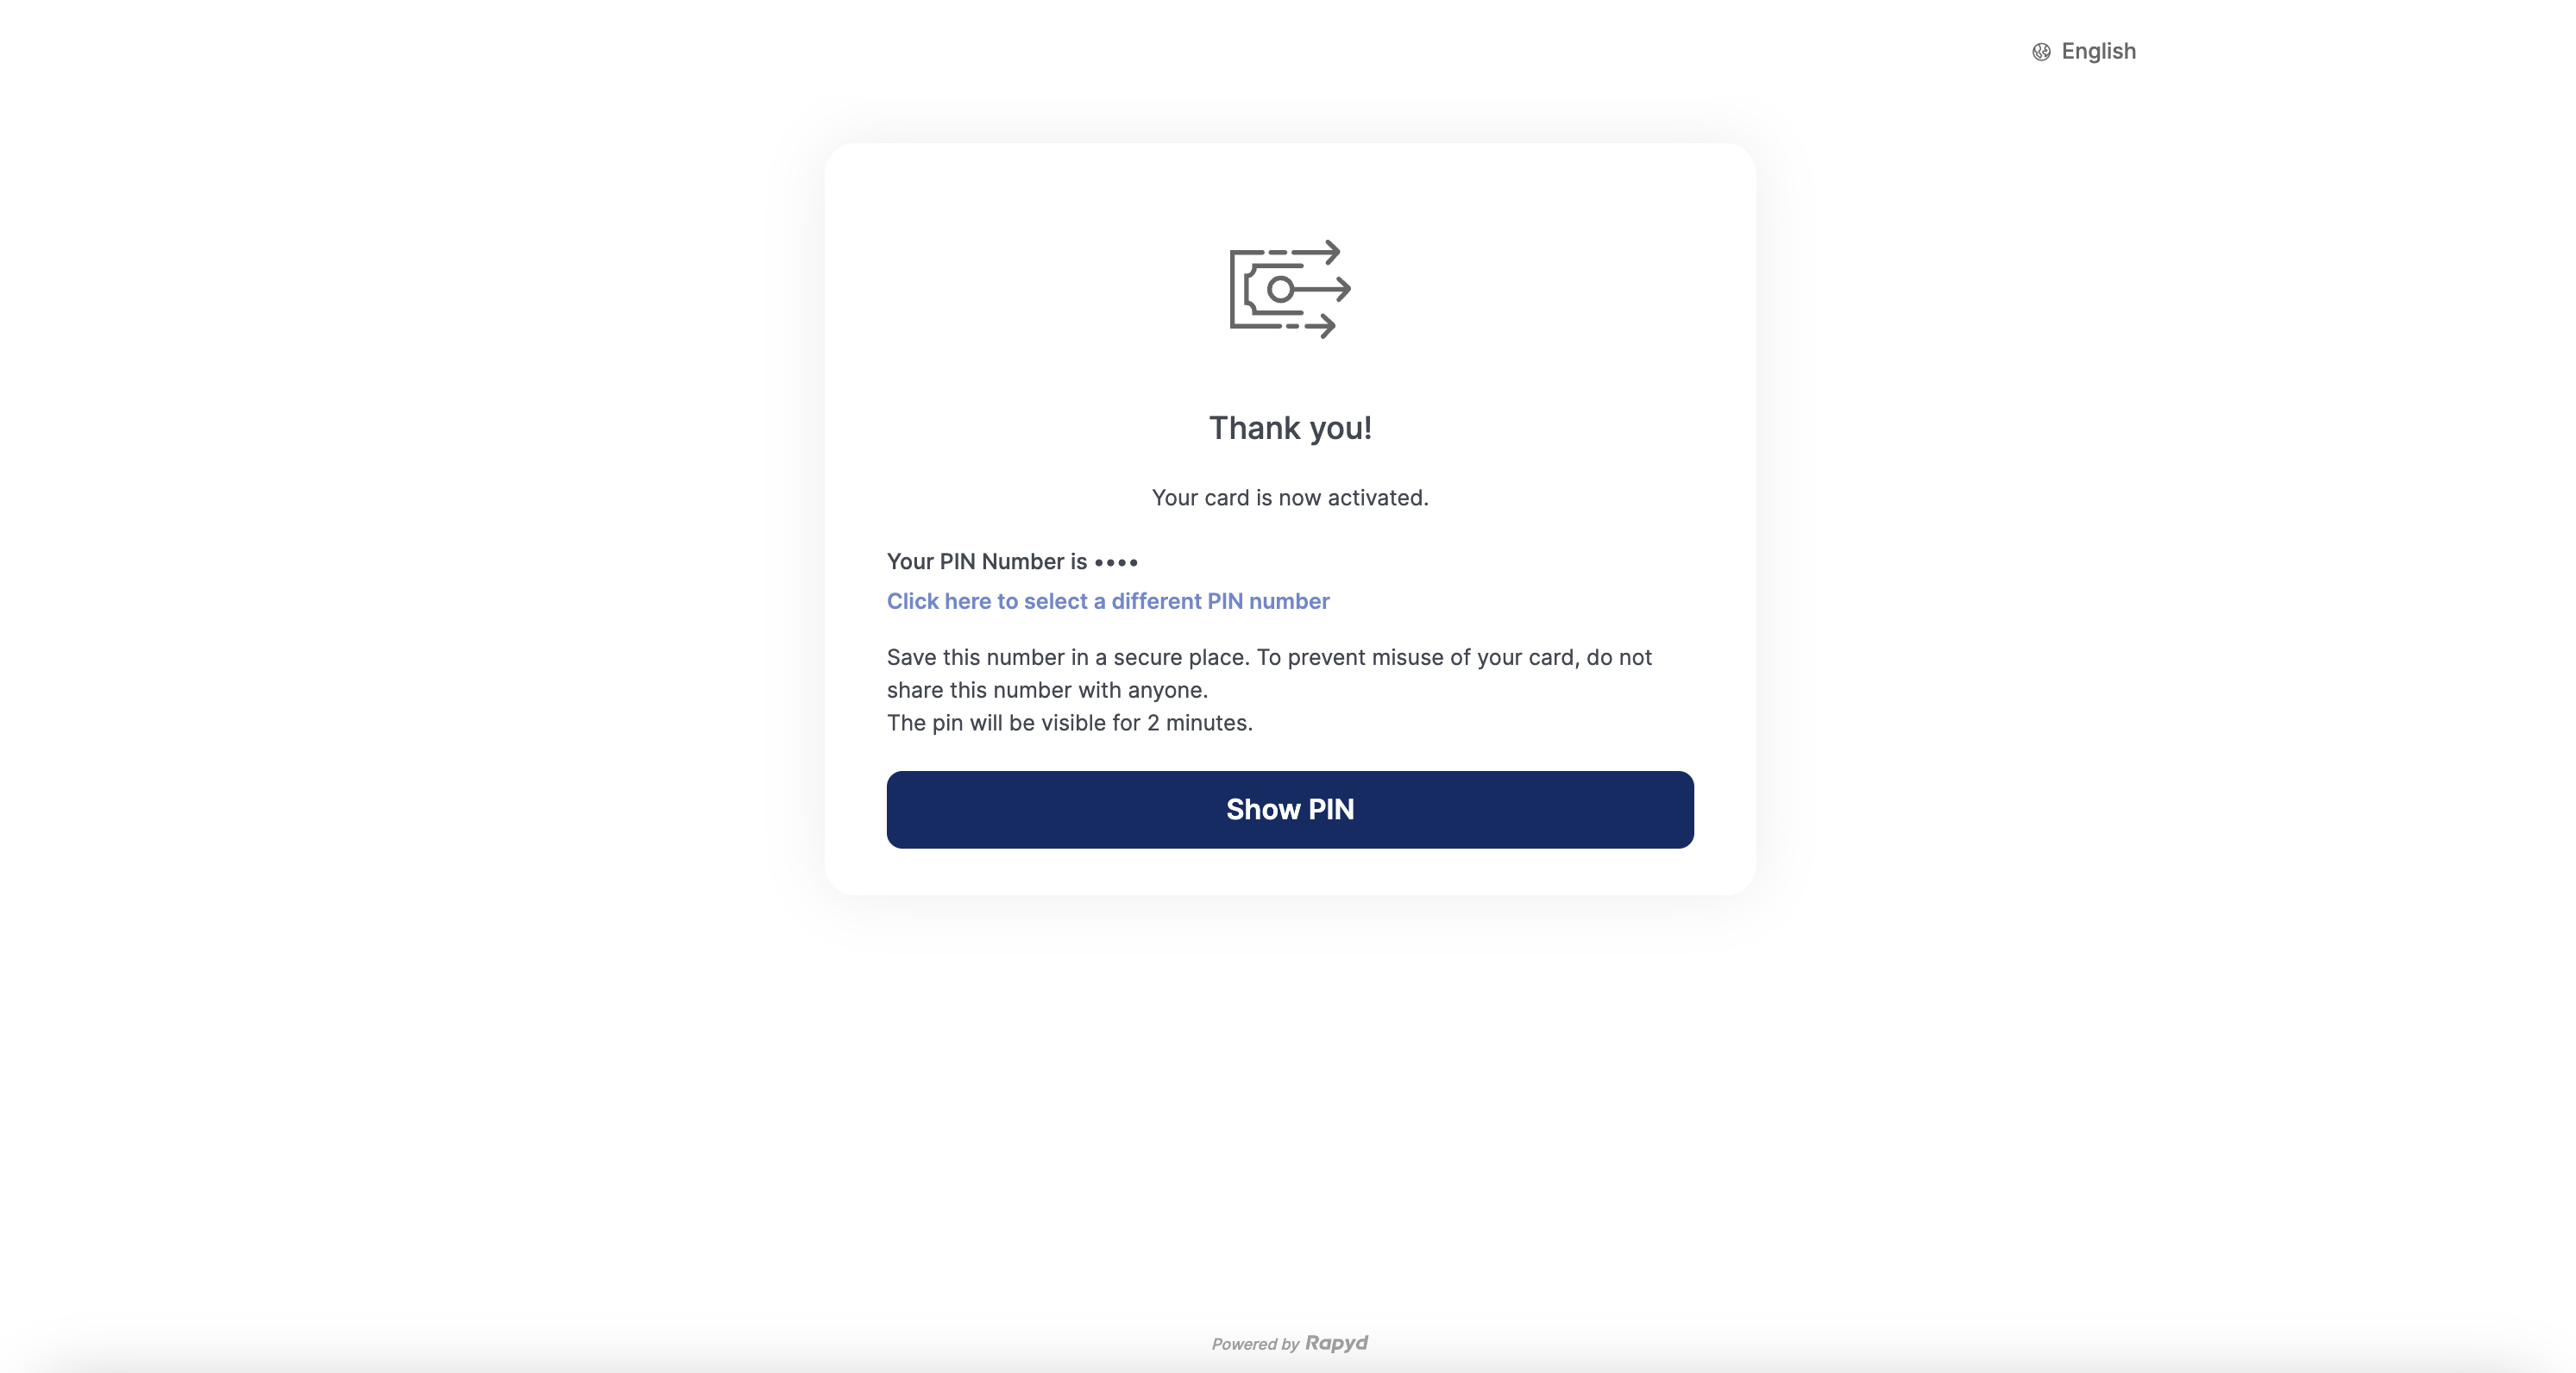
Hosted Card Activation Page Example
Enter the verification code sent to your mobile device.
Click Next.
Enter the card number.
Click Activate.
Redirect to the Card Activation success page.
Click Show PIN to reveal the activated card PIN.
Step 1: Issue Card to a Contact

You request to create an ewallet and contact.
Rapyd creates an ewallet and contact and returns with the IDs starting with ewallet, cont.
You request to issue a card to an ewallet contact.
Rapyd creates a card on top of the ewallet contact with an ID starting with ci_.
Step 2: Activate Card

You request to Create a Hosted Card Activation Page, and send the URL to the contact, or use the toolkit integration to embed the page on your website.
Rapyd creates the Hosted Card Activation Page—returns URL.
You display the Hosted Page to your customer or embed it on your website.
The customer contact completes the hosted page, and Rapyd sends you a notification.
The finite state diagram below summarizes the statuses for the Hosted Card Activation page.

Description of Statuses
Status | Description |
|---|---|
NEW | New - The Hosted Card Activation page was generated. |
DON | Done - The hosted page was completed. The card was activated by Rapyd. |
EXP | Expired - The hosted page is expired. |
Create a Rapyd Wallet and the personal contact of the wallet.
Note: Be sure to follow the Identity Verification process for a contact.
Issue a card to an ewallet contact.
Request
Request
{
"ewallet_contact": "cont_0a73f7d860c7bbd1b8891b322151337b"
}
Response
Response
{
                "status": {
                    "error_code": "",
                    "status": "SUCCESS",
                    "message": "",
                    "response_code": "",
                    "operation_id": "df7b7787-23e7-4edf-bd03-95335e29f0d0"
                },
                "data": {
                    "status": "NEW",
                    "cancel_url": "http://rapyd.net",
                    "complete_url": "http://rapyd.net",
                    "language": "",
                    "merchant_color": "323fff",
                    "merchant_logo": "",
                    "merchant_website": "http://rapyd.net",
                    "merchant_customer_support": {
                        "url": "http://support.rapyd.net",
                        "email": "support@rapyd.net",
                        "phone_number": "555-555-5555"
                    },
                    "merchant_alias": "Test Business",
                    "merchant_terms": "",
                    "merchant_privacy_policy": "",
                    "page_expiration": 1647319627,
                    "redirect_url": "https://sandboxcheckout.rapyd.net/otp?token=hp_issuing_act_5801a620cc1ace4bad6149ace5c61cd7",
                    "region": null,
                    "geo_country": null,
                    "id": "hp_issuing_act_5801a620cc1ace4bad6149ace5c61cd7",
                    "ewallet_contact": "cont_0a73f7d860c7bbd1b8891b322151337b"
                }
             }
The Card Activation Toolkit is designed to embed the Hosted Card Activation Page directly into your website for a seamless workflow to activate issued cards.
Steps for Creating Your Toolkit Integration
Create a Hosted Card Activation Page as described in the request and response.
Add the following code to your checkout page:
Add a
<script>tag with the URL of the Rapyd Checkout Toolkit:<script src="https://toolkit.rapyd.net"></script>
Note:To run this method in the sandbox, use the following code:
<script src="https://sandboxtoolkit.rapyd.net"></script>
Add a
<div>tag with id="card_issuing_activate":<div id="card_issuing_activate"></div>
Initialize the Checkout Page object with the following fields:
JavaScript
let toolkit = new RapydToolkit({
    button_text: "Submit",
            // Text that appears on the 'Submit' button.
            // String. Maximum length is 16 characters.
            // Default is "Place Your Order". Optional.
        pay_button_color: "blue",
            // Color of the 'Submit' button. String.
            // Standard CSS color name or hexadecimal code such as #323fff.
            // Default is the color that is returned in the 'merchant_color'
            // field of the response to 'Create Card Activation Page'. Optional.
        id: "hp_issuing_act_5801a620cc1ace4bad6149ace5c61cd7",
            // ID of the 'Card Activation' response. String. Required.
        close_on_complete: true,
            // Causes the embedded Card Activation Toolkit window to close
            // when the payment is complete. Boolean. Default is 'true'. Optional.
        page_type: "card_issuing_activate"
            /* Mandatory for Card Activation page
                Default is "collection". */
});
Call display Toolkit() to display the checkout page.
toolkit.displayToolkit();
Optional step. If close_on_complete is set to false, call toolkit.closeToolkit() to close the Rapyd Card Activation Toolkit window.
toolkit.closeToolkit();
Insert your code that runs when the following events occur. Use your code to read the event field in the window object.
JavaScript
window.addEventListener('onIssuedCardActivationSuccess', (event) => {
            console.log(event.detail)
            // Returns 'Issued Card' object.
            // Client code.
})

window.addEventListener('onIssuedCardActivationFailure', (event) => {
            console.error(event.detail.error)
            // Triggered when the activation action fails with the error object
            // Client code.
})

window.addEventListener('onOTPFailure', (event) => {
            console.error(event.detail.error)
            // Triggered when the OTP confirmation fails with the error object
            // Client code.
})

window.addEventListener('onIssuedCardSetPinFailure', (event) => {
            console.error(event.detail.error)
            // Triggered when the card activation is successful but the PIN code was not set
            // Client code.
})

window.addEventListener('onLoading', (event) => {
            console.log(event.detail.loading)
            // returns true or false depending on the loading state
            // Client code
})
Sample Embedded Rapyd Issued Card Activation Toolkit
Here's an example of a Rapyd Issued Card Activation page created using the Toolkit:
HTML
<!DOCTYPE html>
<html>

<head>
    <meta http-equiv="content-type" content="text/html; charset=utf-8">
    <meta name="viewport" content="width=device-width, initial-scale=1.0">
    <title>Rapyd Card Activation</title>
    <script src="https://toolkit.rapyd.net"></script>
    <script>
        window.onload = function () {
            let toolkitcheckout = new RapydToolkit({
                pay_button_text: "Submit",
                pay_button_color: "blue",
                id: "hp_issuing_act_5801a620cc1ace4bad6149ace5c61cd7"
            });
            toolkit.displayToolkit();
        }
        window.addEventListener('onIssuedCardActivationSuccess', function (event) {
            console.log(event.detail)
        });
        window.addEventListener('onIssuedCardActivationFailure', function (event) {
            console.log(event.detail.error)
        });
    </script>
</head>

<body style="background-color: #f1f1f1; display: flex; align-items: center; flex-direction: column; margin: 0">
    <h1>Rapyd Card Activation Demo</h1>
    <div style="width: 500px" id="card_issuing_activate"></div>
</body>

</html>
On successful activation, the clients receive an 'onIssuedCardActivationSuccess' event with the issued card object.
Take note of the following Hosted Card Activation Paged Object fields and the tasks associated with each of them.
Description of Fields
Field | Description |
|---|---|
ewallet_contact | ID of the Contact object. String starting with cont_. |
card_id | ID of the Issued Card object, a string starting with ci_. |
assigned_at | Time that the card was assigned to a cardholder, in Unix time. Response only. |
activated_at | Time that the card was activated, in Unix time. Response only. |
created_at | Time of creation of the issued card object, in Unix time. Response only. |
card_program | ID of the card program that the card is issued from. String starting with cardprog_ . |