Rapyd Payments Plugin for OpenCart
Accept cross-border payments from your OpenCart store.
Offering more payment methods drives increased conversions and customer loyalty. Rapyd offers this plugin for over 50 countries.
Download it now from the OpenCart Extensions Marketplace or from your OpenCart control panel. For detailed information, read the full instructions on this page.
Rapyd Account Connection Limit
You can only connect one store per Rapyd Account.
You must be domiciled in one of the following countries in order to accept payments.
Andorra, Australia, Austria, Belgium, Bosnia and Herzegovina, Brazil, Bulgaria, Chile, Colombia, Croatia, Cyprus, Czech Republic, Denmark, Dominican Republic, El Salvador, Estonia, Finland, France, Georgia, Germany, Gibraltar, Greece, Greenland, Hong Kong, Hungary, Iceland, India, Indonesia, Ireland, Israel, Italy, Japan, Latvia, Liechtenstein, Lithuania, Luxembourg, Macedonia, Malaysia, Malta, Mexico, Moldova, Monaco, Montenegro, Netherlands, New Zealand, Norway, Peru, Philippines, Poland, Portugal, Romania, San Marino, Singapore, Slovak Republic (Slovakia), Slovenia, South Africa, South Korea, Spain, Sweden, Switzerland, Taiwan, Thailand, Turkey, United Kingdom, United States of America (USA), Vatican, Vietnam, Virgin Islands (US)
How to Activate OpenCart
Activate and set up your plugin.
Access sandbox mode and test payments.
View supported payment methods.
View payment reports.
Invite team members.
Complete KYB steps to fully activate your account.
Sign in to Client Portal and navigate to Plugins. Select OpenCart.
In the OpenCart window, click the Active toggle button.
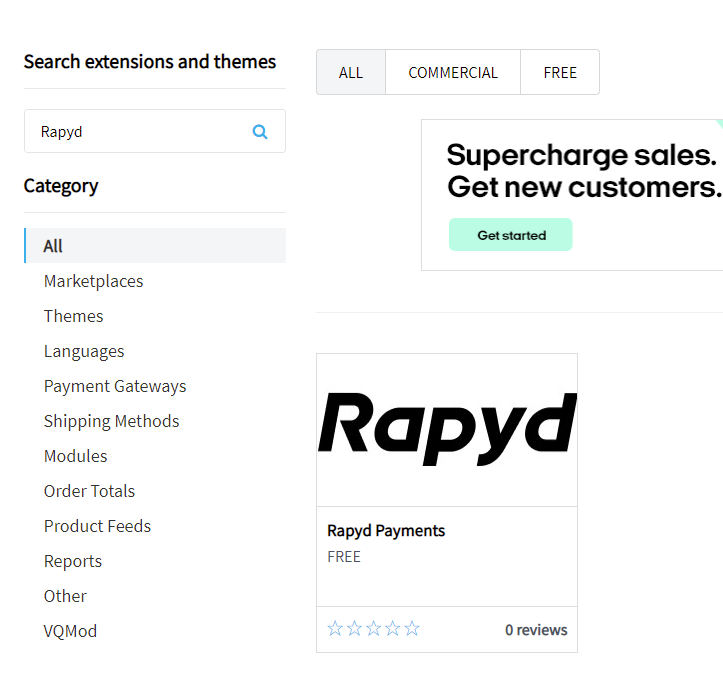
Navigate to the OpenCart marketplace by clicking on this direct link.
Enter ‘Rapyd’ in the Search field.

The Rapyd Payments plugin appears in the results.
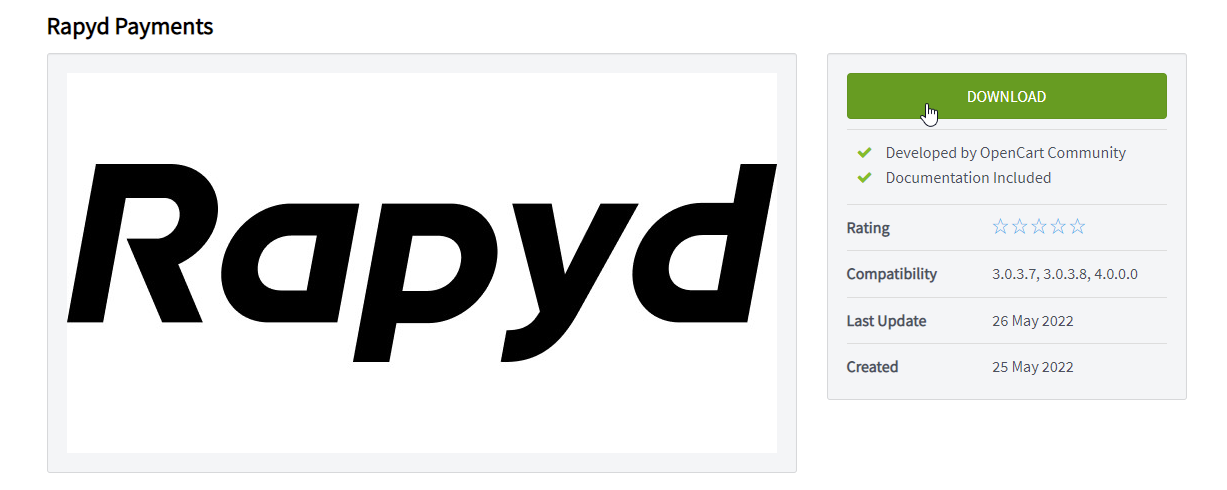
Click on the Rapyd plugin, and then click on the Download button.
Note
The Client Portal must be in sandbox mode during this testing phase. See Developers.
There are four Rapyd payment types: Rapyd Bank, Rapyd Card, Rapyd Cash, and Rapyd eWallet. You should do the following procedure for each payment type that you want to add to your OpenCart site.
In the OpenCart control panel, go to Extensions > Extensions, and select ‘Payments’ as the extension type.
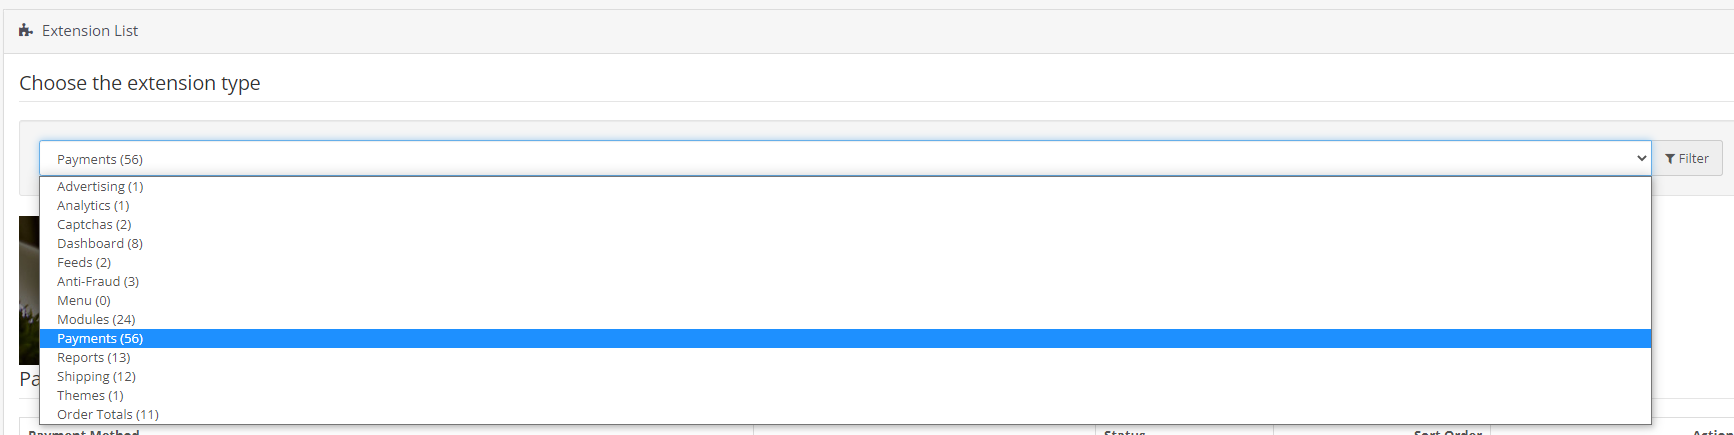
Scroll down to the Rapyd Payments extensions.

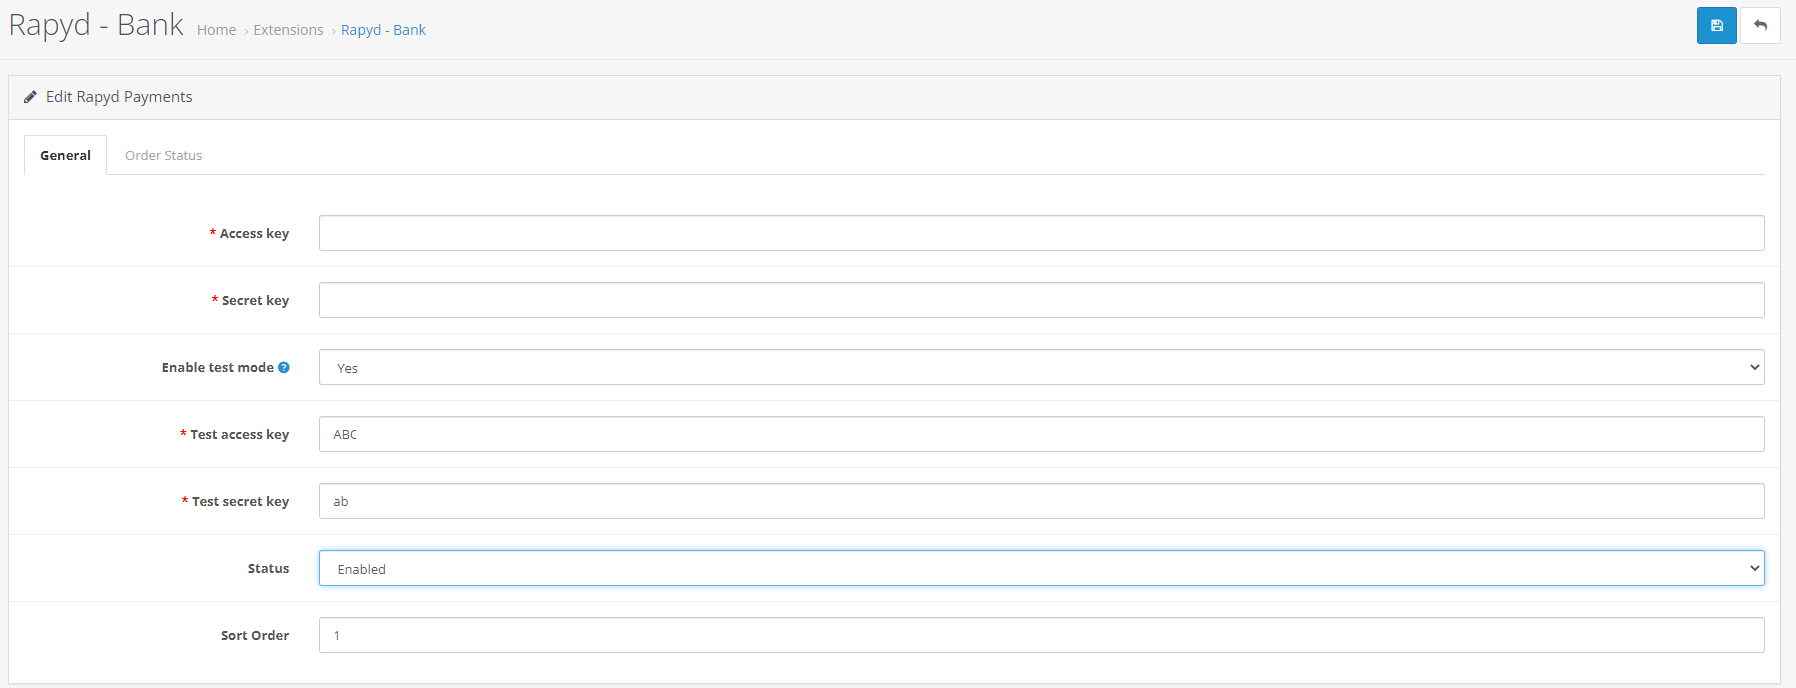
Click on the + icon next to the type of Rapyd payment you want to enable. The Rapyd Payments General tab appears:
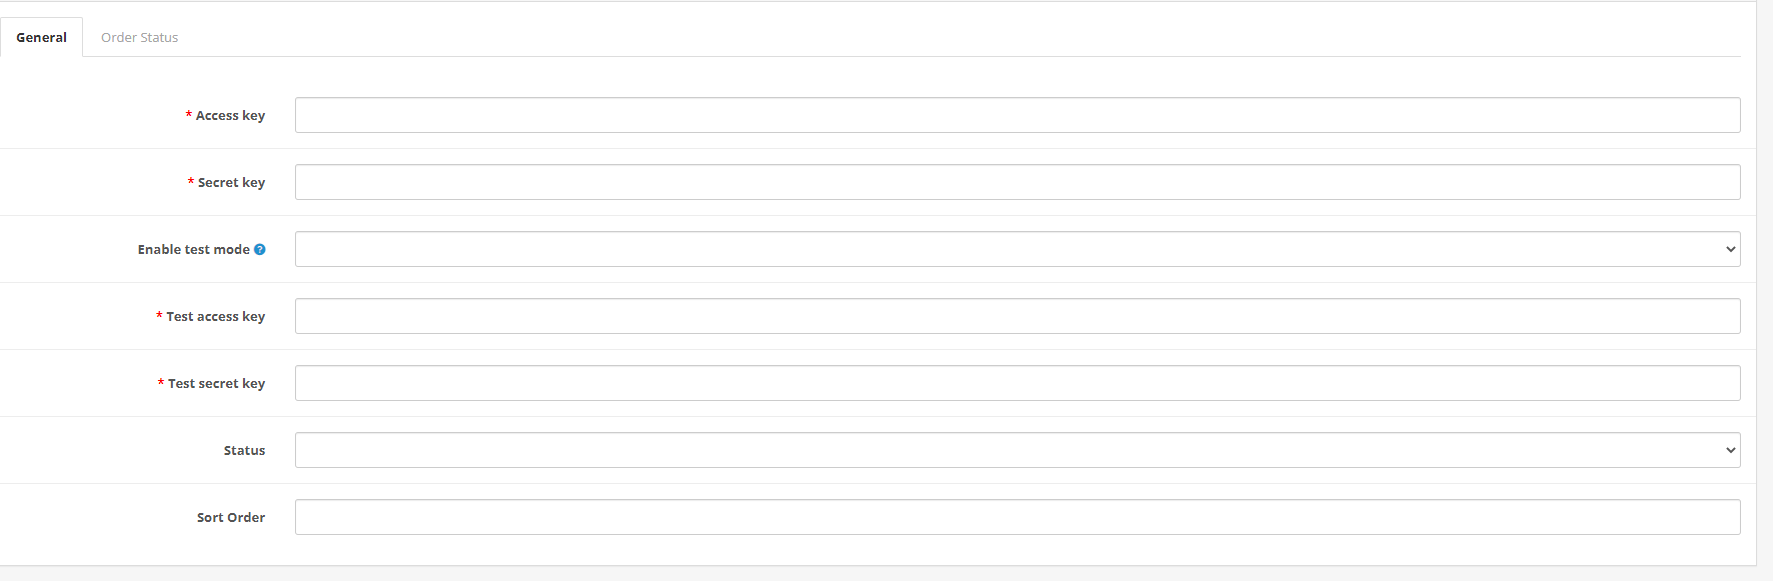
Select Yes in the Enable test mode field.
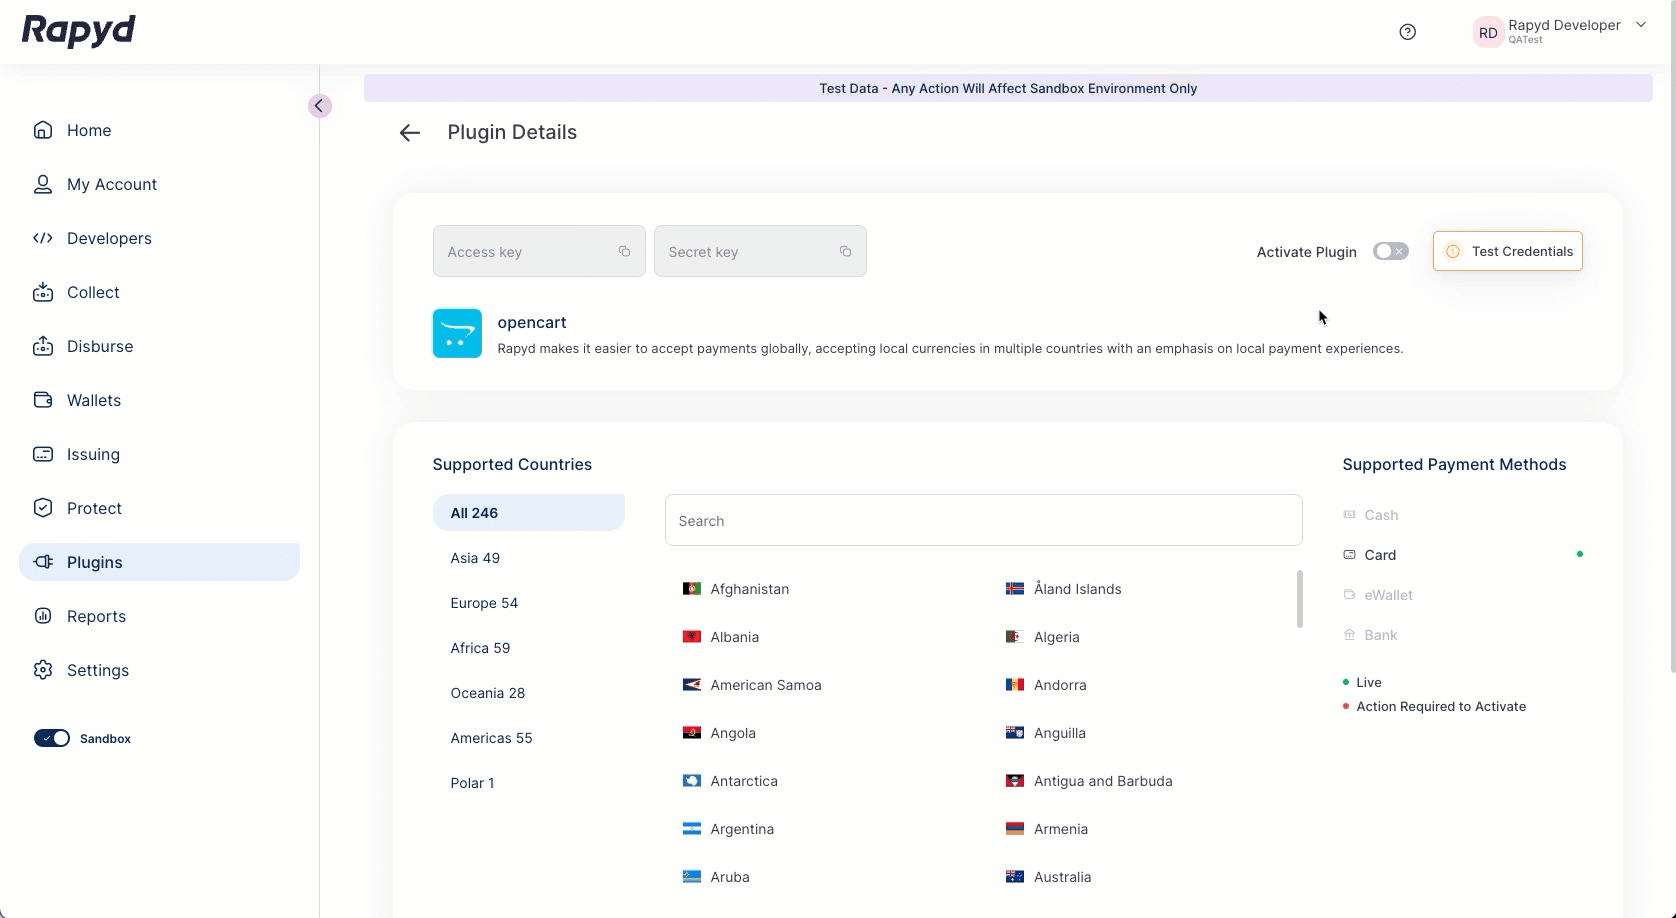
Enter your Rapyd Access Key and Secret Key for the sandbox environment in the Test Access key and Test Secret key fields. Note that you should use the unique sandbox keys for the OpenCart plugin. See also Plugins and Add-Ons.
In the Status field, select Enabled.
In the Sort Order field enter an integer between 1 and 4 where 1 is the payment type that appears on the top of the list on your site’s checkout screen.
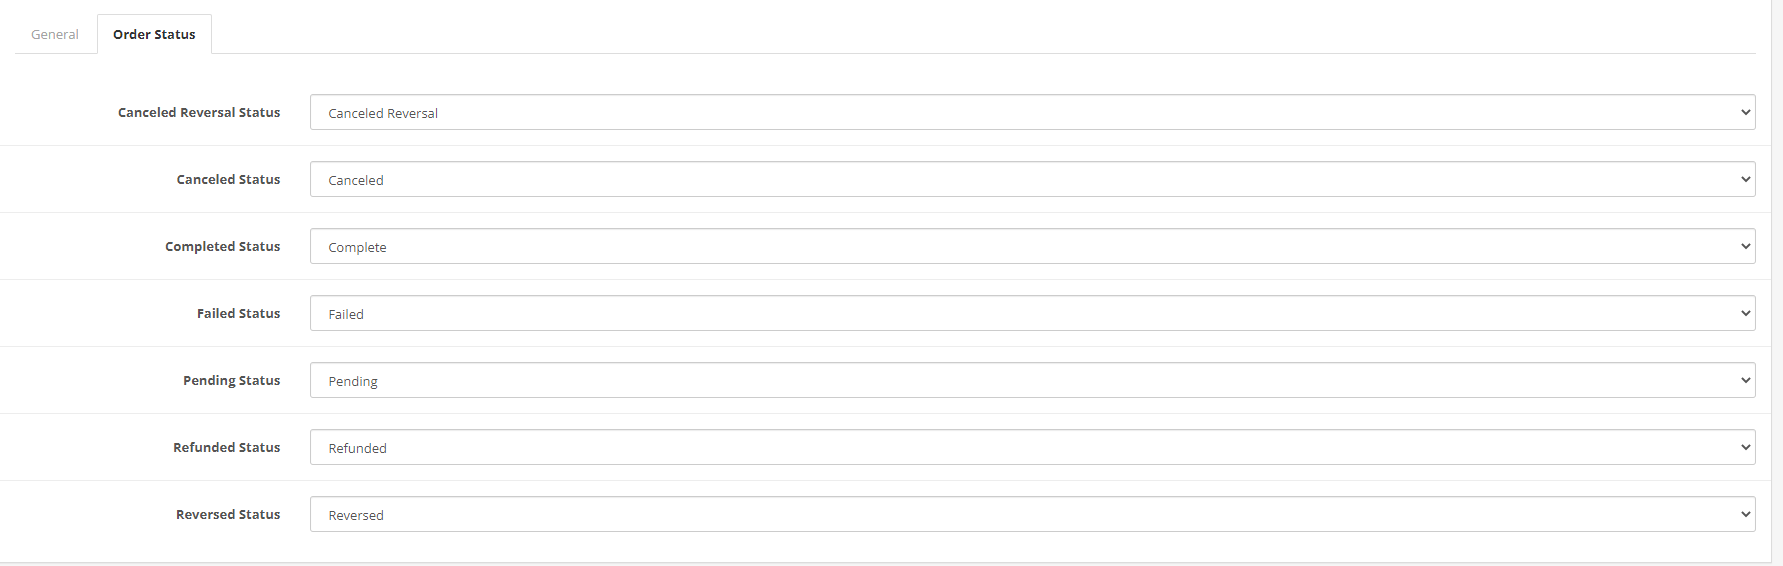
Optionally, set up the order status for the payment type that you are using via the Order Status tab.
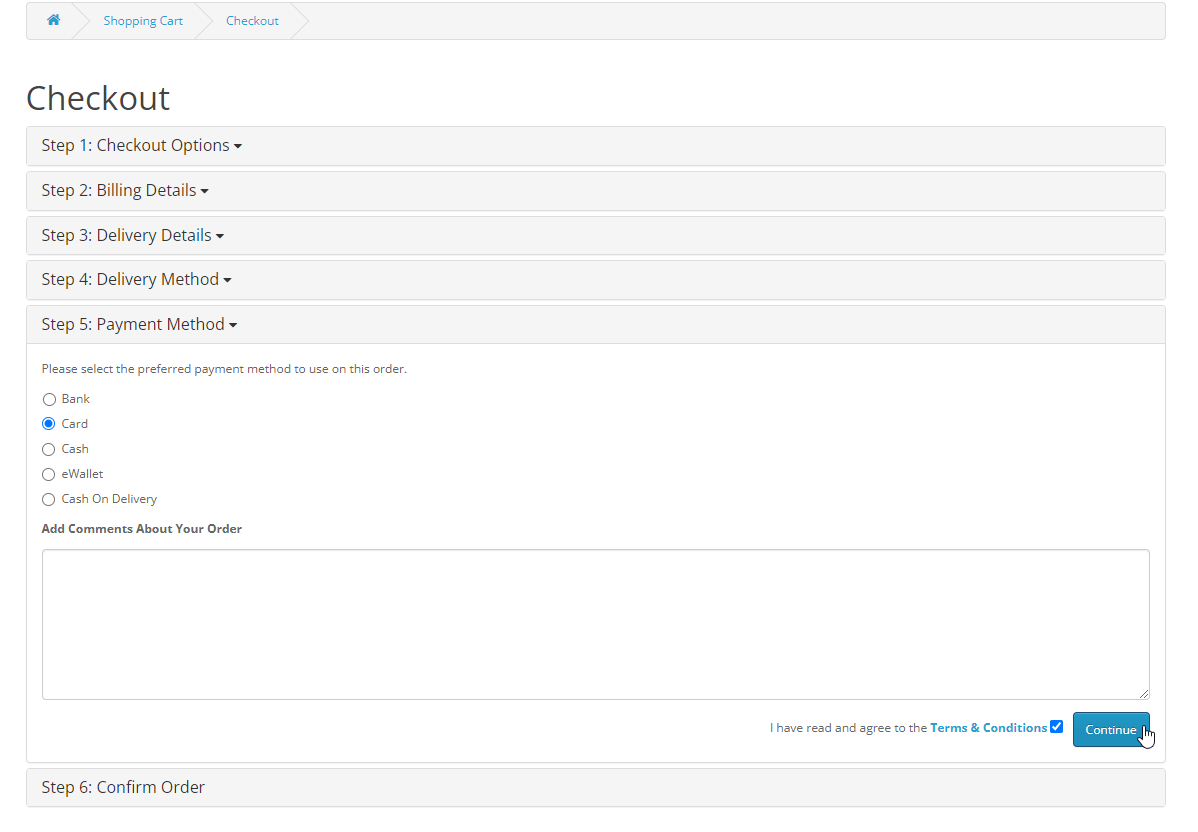
Go to your OpenCart ecommerce site as a customer and add an item to the cart.

Click on the Checkout button.

Select Guest Checkout and click the Continue button.
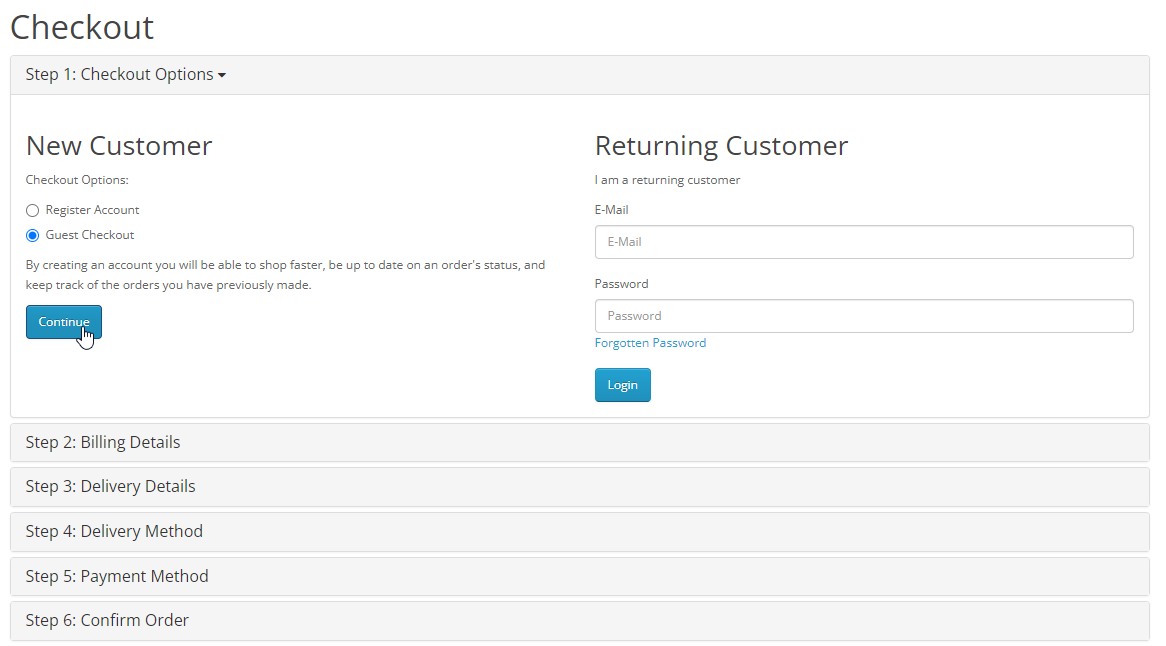
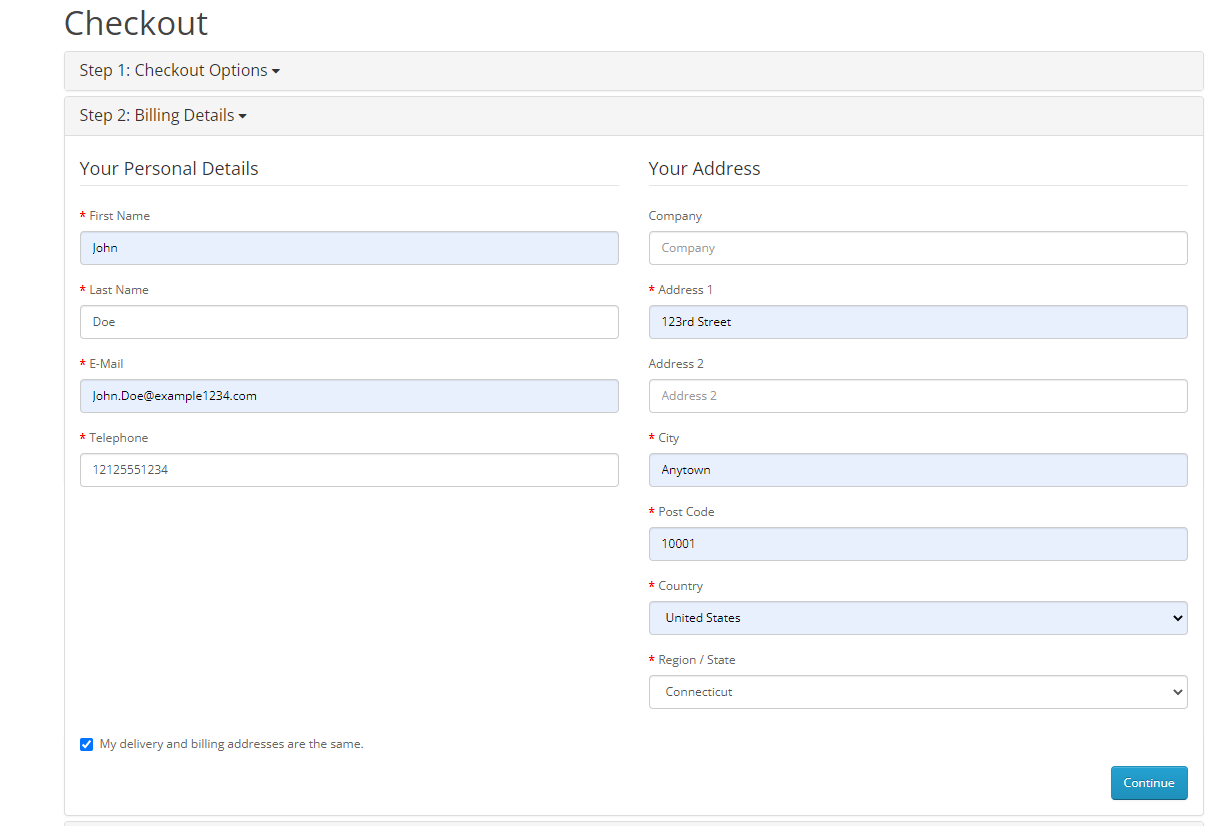
Enter the billing and delivery details, and click the Continue button.
Select a delivery method, and then select Card as the Rapyd Payments method. Agree to the terms and conditions, and click the Continue button.
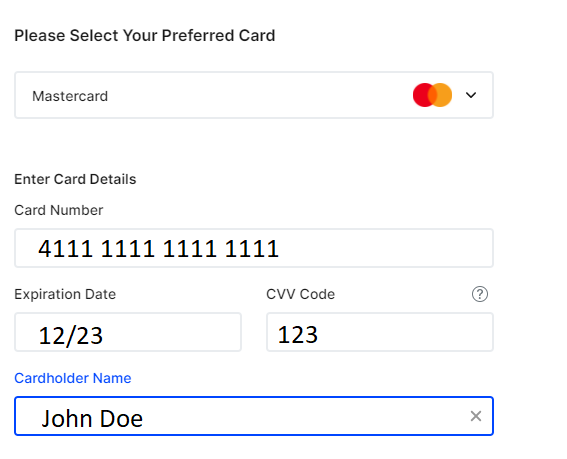
For testing purposes, enter the following values for a Mastercard card payment:
Card: Mastercard
Card number: 4111 1111 1111 1111
Expiration Date: 12/23
CVV Code: 123
Cardholder Name: John Doe
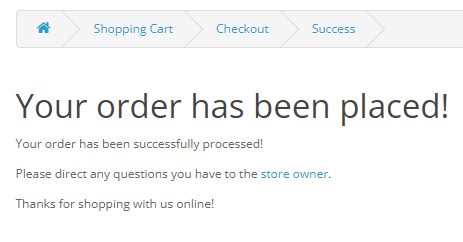
Click on the Click to Pay button. A confirmation message appears.
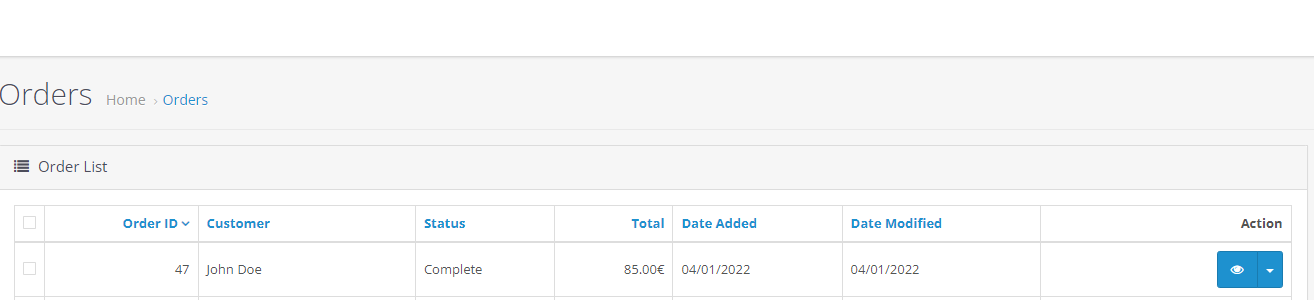
Go to the Sales > Orders section of the OpenCart Admin panel, and verify that the payment you have made is displayed with the correct status.
After you have finished testing the module, you can switch to production mode.
Note
The Client Portal must be in production mode.
There are four Rapyd payment types: Rapyd Bank, Rapyd Card, Rapyd Cash, and Rapyd eWallet. You should do the following procedure for each payment type that you want to set for production.
In the OpenCart control panel, go to Extensions > Extensions, and select ‘Payments’ as the extension type.
Scroll down to the Rapyd Payments extensions.
Note
Click on the + icon next to the type of Rapyd payment you want to enable. The Rapyd Payments General tab appears:
Select No in the Enable test mode field.
Enter your Rapyd Access Key and Secret Key for the production environment in the Access key and Secret key fields. Note that you should use the unique production keys for the OpenCart plugin. See also Plugins and Add-Ons.
In the Status field, select Enabled.
In the Sort Order field enter an integer between 1 and 4 where 1 is the payment type that appears on the top of the list on your site’s checkout screen.
Optionally, set up the order status for the payment type that you are using via the Order Status tab.
After the checkout process completes, the customer can be forwarded to a landing page. This may be the main URL of the ecommerce site or any other landing page that you may want to define. To set the landing page URL:
Sign in to the Client Portal and navigate to Settings > Branding.
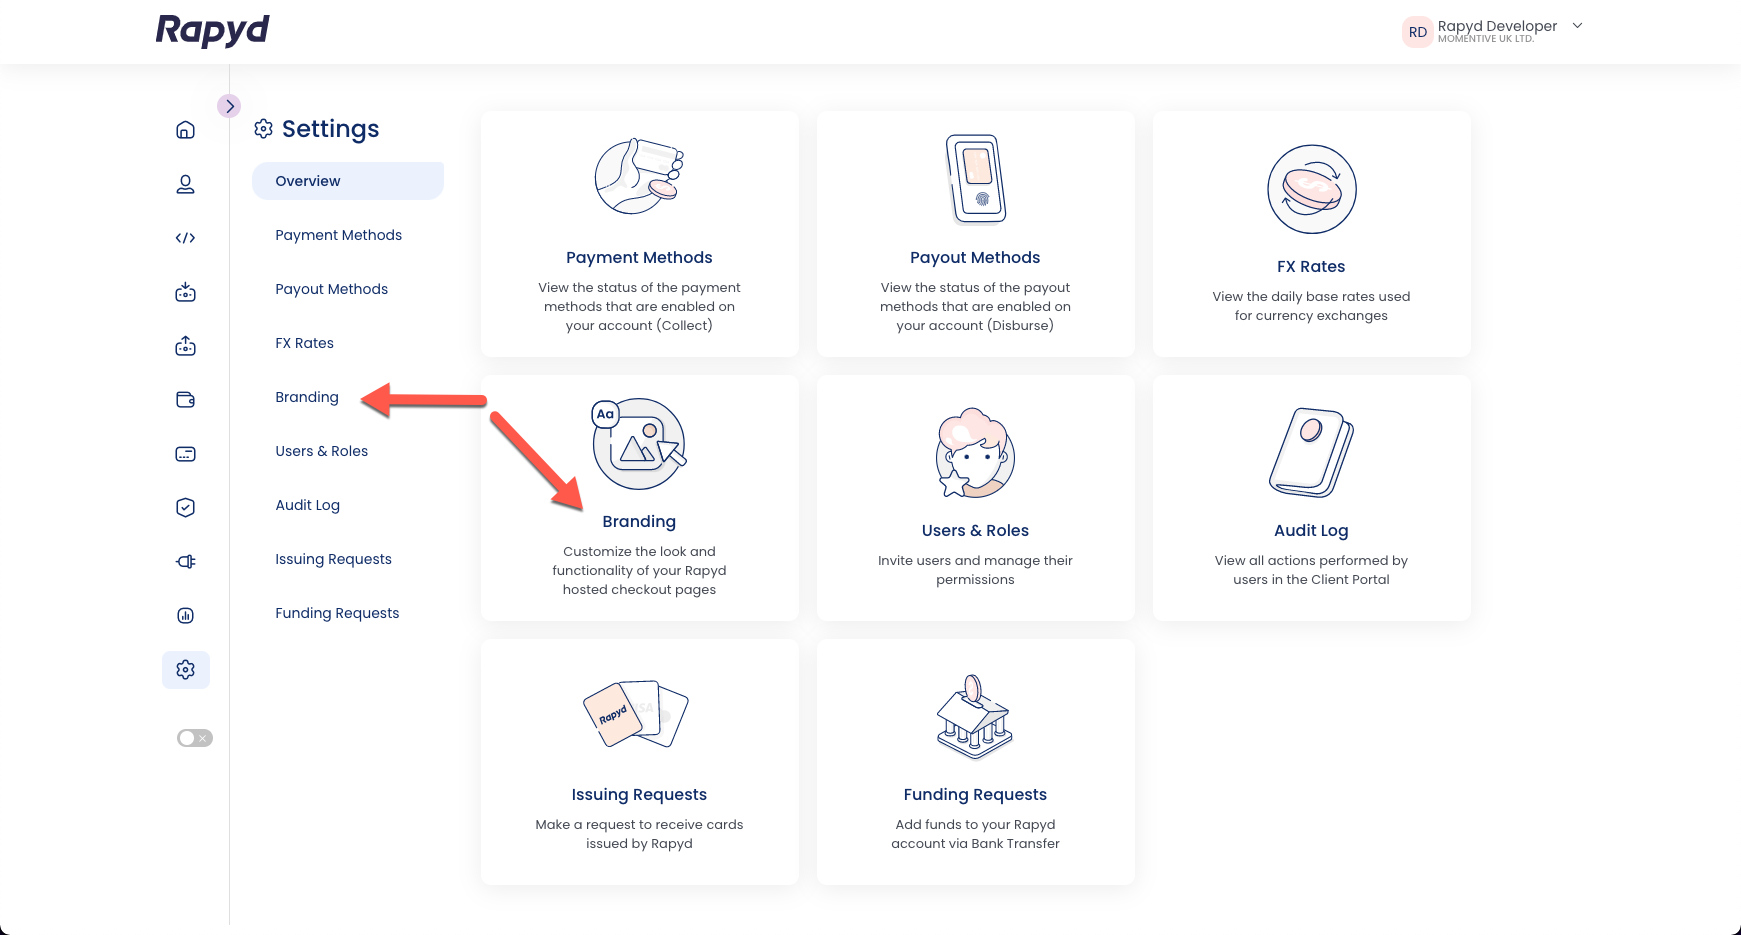
Click on the link icon and enter the URL of the landing page in the Fallback URL field.
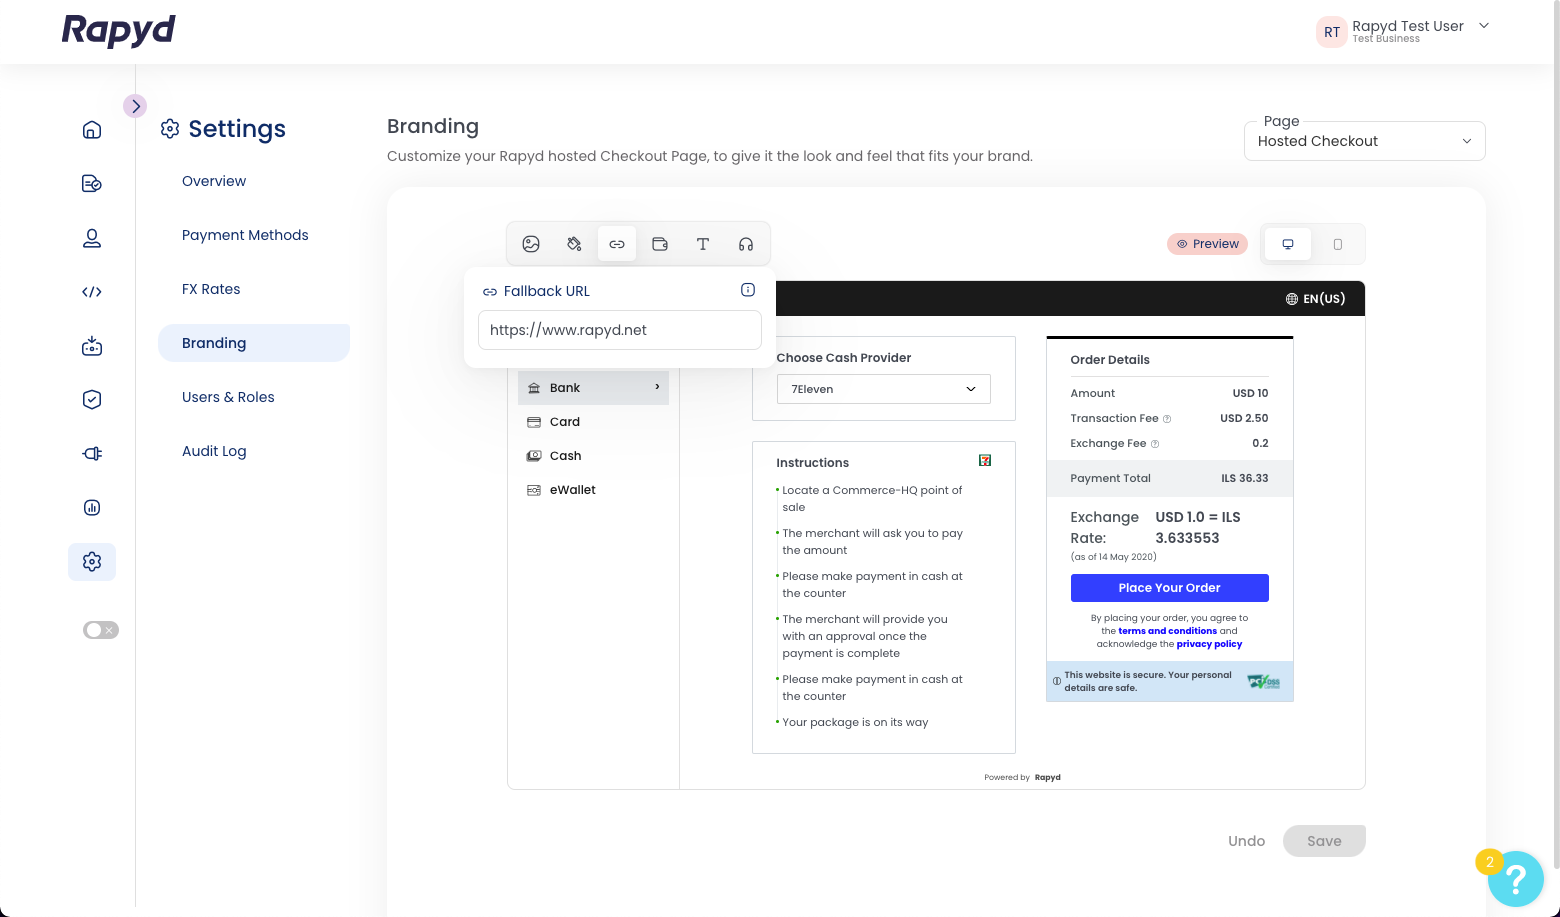
Click Save.
For more information on customizing your checkout page, see Hosted Checkout Page Integration Steps.